In today's article, we will show you how we built our “catio”.
WHAT IS A CATIO?
A catio is an outdoor cat enclosure; a place where your four paws pal can be outside, feeling the wind and watching what is happening out of home, without running away or getting lost.
SHOULD YOU BUILD OR BUY AN ALREADY MADE CATIO?
The answer to this question depends on the time, effort, and money you want to spend.
There are already made catios, very practical for those who do not like to do themselves all the job. It is usually more expensive than making your cat enclosure, but why not? There are several price ranges, depending on the type/quality and size.
HANDMADE CATIO
Unless you want something really special, a common catio is not expensive and in most cases what you will need are a net and cable ties or, if you need to make holes, a drill, screws and maybe some posts. The total cost can vary between 8 to 150 dollars.
HOW DID WE ADAPT OUR BALCONY TO THE CAT?
It took us more than one month to adapt our balcony properly, so Gus would not jump out and fall.
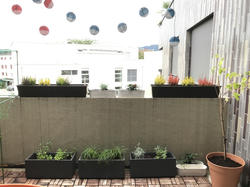
In a first attempt, we were very naive and thought that some vases with flowers on the top of the balcony would discourage him from jumping one and half meters.
Even if Gus had not jumped, because we were always very careful, we soon noticed that his hunting instincts were making it a possibility and once we live on a second floor, we had to make a plan B.
A CHALLENGE WITH AN AWNING
Our balcony has an electric awning and the fact that it goes down with inclination with a maximum high of two meters in the lower part, we could not close the upper part as a “real” catio, but we could find a solution that we will share with you and maybe will inspire you, especially if you have a balcony as we do.
WHAT MATERIALS DID WE USE?
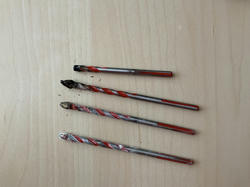
1)PVC Posts 2)Metal “angles” with holes to put the screws and the posts. 3)Connectors to the PVC cables 4)Drill 5)Screws 6)Cable ties 7)Net for cats (with tiny holes and knots between the holes)
The first step was to measure and make holes with the drill to fix the metal angles with screws. Be sure you have enough drills. We needed 7 because our balcony surface is really tough and some burned while trying to do it.
After we fit in the PVC posts at each angle (the PVC hole should not be very large so they can fit properly and do not fall from the angles that should have at least 6 or 7 centimeters in length.
Finally, we put the cat net using cable ties to secure it around the posts and between the different parts of the net (our balcony has 3 meters, and the net we bought had 6, so we made a double layer protection).
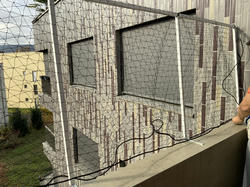
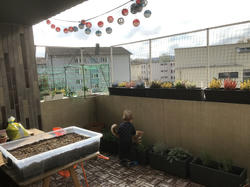
Be sure that there are no spaces or holes between the balcony surface and the net so the cat cannot escape through it.
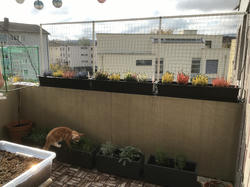
We put the vases we had before above so it creates an extra barrier and also some vases below with catnip, mint, and herbs that the cat can feel happy and entertained with.
With a table and two tree trunks to climb and sharpen his nails, Gus spends now a wonderful, happy and safe time on the balcony, playing and hunting insects that come from time to time flying around.
Let us know if you have some tips or ideas to share.